The Angular 2 application mainly consists of the following eight parts:
1.Modules
2.Components
3.Templates
4.Metadata
5.Data Binding
6.Directives
7.Services
8.Dependency Injection
The following figure shows how each part works with each other:
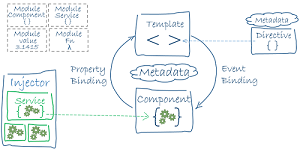
The Templates in the figure is composed of the HTML syntax of theAngular extension, the Components class is used to manage these templates, the application logic is completed through Services, then the services and components are packaged in the module, and finally the application is started by booting the root module.
Next, we will analyze the above eight parts separately: The module consists of a piece of code that can be used to perform a simple task. The Angular application is modular and has its own module system: Each Angular should have at least one module (root module), which can generally be named: The Angular module is a module with Several important attributes are as follows: The simplest root module: Next we start the application by booting the root module, and the development process is usually in the A component is a control class of a template that handles the view portion of the application and logical pages. Component is the foundation and core of Angular application, which can be used in the whole application. The component knows how to render itself and configure dependency injection. Components interact with the view through a number of API consisting of properties and methods. There are three steps to create an Angular component: From Create a normal class and use the In The default language for Angular templates is HTML. We can tell Angular how to display the component by using a template to define the view of the component. Here is a simple example: In Angular, double curly braces are used as the interpolation syntax by default, and the value in the middle of the braces is usually the variable name of a component property. The metadata tells Angular how to handle a class. Consider the following situation where we have a component called You can attach metadata to this class and tell Angular Component that it is a component. In TypeScript, we use decorator to attach metadata. The Data binding provides an application with a simple and consistent way to display data and data interaction, which is a mechanism for managing values in the application. Through this mechanism, values can be taken and assigned from HTML, making it easier and faster to read and write data and to persist data. As shown in the figure, there are four forms of data binding syntax. Each form has a direction-from DOM to DOM, in both directions, as indicated by the arrow in the figure. Interpolation: displays component values in the HTML tag. Attribute binding: sets the property of the element to the value of the property in the component. Event binding: triggered when the component method name is clicked. Two-way binding: usin The Angular template is dynamic. When Angular renders them, it modifies the DOM according to the instructions. An instruction is a class with instruction metadata. In TypeScript, you want to pass the The following three types of instructions are included in Angular: Attribute instruction: an instruction used in the form of an attribute of an element. Structure instruction: used to change the structure of the DOM tree Component: as an important subclass of an instruction, a component can essentially be seen as an instruction with a template. A service in Angular2 is an independent module that encapsulates a specific function and can be injected into it for others to use. There are many kinds of services, including values, functions, and features required by the application. For example, when duplicate code occurs in multiple components, the duplicate code is extracted into the service for code reuse. Here are several common services: Log service Data service Message bus Tax calculator Application configuration The following example is a logging service that records logs to the browser’s console: Inversion of Control, abbreviated as IoC, is a design principle in object-oriented programming that can be used to reduce the coupling between computer code. One of the most common methods is called Dependency Injection (DI), and another is called dependency lookup (Dependency Lookup). Through control inversion, when an object is created, an external entity that regulates all objects in the system passes references to the objects onwhich it depends. It can also be said that dependencies are injected into the object. In the traditional development model, the caller is responsible for managingthe dependencies of all objects, and circular dependency has always been a nightmare, while in the dependency injection model, this management is handed over to the Injector, which is responsible for the replacement of dependent objects at run time, not at compile time. This kind of control reversal, the characteristic of running injection is the essence of dependency injection. When you The injector is a container that maintains service instances and holds previously created instances. If the requested service instance is not already in the container, the injector creates a service instance, adds it to the container, and returns the service to Angular. When all services are parsed and returned, Angular invokes the component’s constructor with those services as parameters. This is dependency injection. 1.4.1. Module 
NgModules
.
AppModule
.
@NgModule
the class of the decorator that receives a metadata object that describes the properties of the module.
declarations
(declaration)-the view class belongs to this module. Angular has three types of view classes: components, instructions, and pipes.
exports
-A subset of declaration that can be used for component templates in other modules.
imports
-modules in this module component template that need to be exported by other classes.
providers
-creator of the service. This module adds them to the global service table so that they can be accessed in any part of the application.
bootstrap
-the main view of the application, called the root component, is the host of all other application views. Only the root module needs to be set
bootstrap
property. 1.4.2.
app/app.module.ts
file: ¶ import { NgModule } from '@angular/core';
import { BrowserModule } from '@angular/platform-browser';
@NgModule({
imports: [ BrowserModule ],
providers: [ Logger ],
declarations: [ AppComponent ],
exports: [ AppComponent ],
bootstrap: [ AppComponent ]
})
export class AppModule { }
main.ts
to boot in the file
AppModule
the code is as follows: 1.4.3.
app/main.ts
file: ¶ import { platformBrowserDynamic } from '@angular/platform-browser-dynamic';
import { AppModule } from './app.module';
platformBrowserDynamic().bootstrapModule(AppModule);
1.4.4. Components 
@angular/core
introduce into
Component
modifier
@Component
Embellish it.
@Component
, setting up
selector
custom tags, and
template
template 1.4.5. Templates 
<div>
Website address : {{site}}
</div>
1.4.6. Metadata 
Component
is a class until we tell
Angular
, this is a component until now.Example 
@Component({
   selector : 'mylist',
   template : '<h2>Rookie Tutorial</h2>'
   directives : [ComponentDetails]
})
export class ListComponent{...}
@Component
decorator can accept a configuration object and mark the following class as a component class.
Angular
components and their views are created and displayed based on this information.
@Component
description of the configuration items in:
selector
a css selector that tells Angular to look for a < mylist > tag in the parent HTML, then create the component and insert it into it.
templateUrl
-the address of the component HTML template.
directives
-an array of components or instructions that this template needs to depend on.
providers
An array containing the dependency injection providers required by the services on which the component depends. 1.4.7. Data binding 

<h3>
{{title}}
<img src="{{ImageUrl}}">
</h3>
<img [src]="userImageUrl">
<button (click)="onSave()">save</button>
Angular
in
NgModel
instructions can be bound in both directions more easily.<input [value]="currentUser.firstName"
(input)="currentUser.firstName=$event.target.value" >
1.4.8. Directives 
@Directive
the decorator attaches metadata to the class.<li *ngFor="let site of sites"></li>
<site-detail *ngIf="selectedSite"></site-detail>
\*ngFor
tell Angular to be
sites
each item in the list generates a
<li>
label.
\*ngIf
indicates that the selected item is included only if it exists.
SiteDetail
module. 1.4.9. Service (Services) 
export class Logger {
  log(msg: any)   { console.log(msg); }
  error(msg: any) { console.error(msg); }
  warn(msg: any)  { console.warn(msg); }
}
1.4.10. Dependency injection 
Angular
can see which services the component needs by looking at theparameter types of the constructor. For example,
SiteListComponent
theconstructor of the component requires a
SiteService
:constructor(private service: SiteService) { }
Angular
create a component, you first find an injector (Injector) for the services the component needs.