In this section, we will show you how to configure the execution environment of Angular 2.
This chapter uses JavaScript to create Angular applications, but you can also use TypeScript and Dart to create Angular applications.
The file directory structure used in this section is as follows:
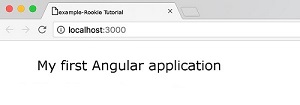
We recommend it here. Create Due to After execution, we can use the After a successful execution Components (Component) are the foundation and core of Angular applications. A component wraps a specific function, and components work together to assemble a complete application. Generally speaking, a component is a JavaScript class that controls the view template. Next, we are in And add component files Next, let’s analyze the above code: We call the global Angular through chaining Angular applications are modular, ES5 does not have a built-in modular system, we can use third-party modular systems, and then we create independent namespaces for the application We will take the overall situation Most of the application files are passed through the In this example When we want to create an application that is meaningful, we can use properties and application logic to extend the object. The Angular application consists of an Angular module, which contains the components needed by the Angular application and anything else. Next, we create Add We need two things to start the application: Angular’s The application root module AppModule mentioned above. Next, create 1.Load the JavaScript library we need 2.Load our own JavaScript files and pay attention to the order 3.We are in The execution process is as follows: when Angular is in Open the terminal and enter the following command: Visit http://localhost:3000/ , and the browser displays the result as follows: In this way, even if our first Angular2 application is created, the source code used in this article can be downloaded in the following ways, not including 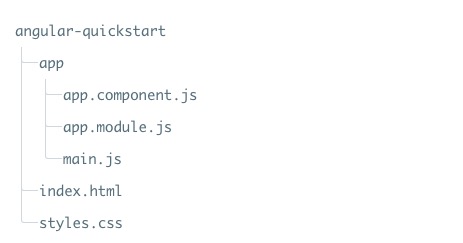
1.2.1. Create a profile 
Create a directory 
$ mkdir angular-quickstart
$ cd angular-quickstart
1.2.2. Load the required libraries 
npm
as a package management tool, if you do not have npm installed or do not understand
npm
can check out our tutorial, introduction to using NPM.
package.json
file, the code is as follows:
package.json
file:{
"name": "angular2-quickstart",
"version": "1.0.0",
"scripts": {
"start": "npm run lite",
"lite": "lite-server"
},
"license": "ISC",
"dependencies": {
"@angular/common": "2.0.0",
"@angular/compiler": "2.0.0",
"@angular/core": "2.0.0",
"@angular/forms": "2.0.0",
"@angular/http": "2.0.0",
"@angular/platform-browser": "2.0.0",
"@angular/platform-browser-dynamic": "2.0.0",
"@angular/router": "3.0.0",
"@angular/upgrade": "2.0.0",
"core-js": "^2.4.1",
"reflect-metadata": "^0.1.3",
"rxjs": "5.0.0-beta.12",
"zone.js": "^0.6.23",
"angular2-in-memory-web-api": "0.0.20",
"bootstrap": "^3.3.6"
},
"devDependencies": {
"concurrently": "^2.0.0",
"lite-server": "^2.2.0"
}
}
npm
the domestic access to the official website image is too slow. Here I use Taobao’s
npm
image. Install the image as follows:$ npm install -g cnpm --registry=https://registry.npmmirror.com
cnpm
command to install the module:$ cnpm install
angular-quickstart
will be generated under the directory
node_modules
directory, which contains the modules we need for this example. 1.2.3. Create an Angular component 
angular-quickstart
create a
app
directory:$ mkdir app
$ cd app
app.component.js
the contents are as follows:
app.component.js
file:(function(app) {
app.AppComponent =
ng.core.Component({
selector: 'my-app',
template: '<h1>My first Angular application</h1>'
})
.Class({
    constructor: function() {}
});
})(window.app || (window.app = {}));
core
namespace
ng.core
in
Component
and
Class
method creates a file named
AppComponent
the visual component of the.
Component
method accepts a configuration object that contains two properties
Class
method is where we implement the component itself, in the
Class
method, we add properties and methods to the component, whichare bound to the corresponding view and behavior. 1.2.4. Module 
app
the file code can be wrapped in IIFE (execute the function expression immediately):(function(app) {
})(window.app || (window.app = {}));
app
the namespace object is passed into the IIFE and initialized with an empty object if it does not exist.
app
to add something to the namespace to output the code, we are in the
app.component.js
output in the file
AppComponent
.app.AppComponent =
1.2.5.
Class
define object 
AppComponent
class has only one empty constructor:.Class({
constructor: function() {}
});
1.2.6.
Component
define object 
ng.core.Component()
tell Angular that the class definition object is an Angular component. Pass to
ng.core.Component()
has two fields for the configuration object of
selector
and
template
.ng.core.Component({
selector: 'my-app',
template: '<h1>My first Angular application</h1>'
})
selector
when Angular encounters a
my-app
element, it creates and displays a
AppComponent
an example.
template
property holds the template for the component. 1.2.7. Add
NgModule
app/app.module.js
file, the contents are as follows: 1.2.8.
app.module.js
file: ¶ (function(app) {
app.AppModule =
ng.core.NgModule({
imports: [ ng.platformBrowser.BrowserModule ],
declarations: [ app.AppComponent ],
bootstrap: [ app.AppComponent ]
})
.Class({
constructor: function() {}
});
})(window.app || (window.app = {}));
1.2.9. Start the application 
app/main.js
file:
app/main.js
file: ¶ (function(app) {
document.addEventListener('DOMContentLoaded', function() {
ng.platformBrowserDynamic
.platformBrowserDynamic()
.bootstrapModule(app.AppModule);
});
})(window.app || (window.app = {}));
platformBrowserDynamic().bootstrapModule
function.
index.html
code is as follows:
index.html
file: ¶ <html>
<head>
<meta charset="utf-8">
<title>Angular 2 Example - Rookie Tutorial(runoob.com)</title>
<meta name="viewport" content="width=device-width, initial-scale=1">
<link rel="stylesheet" href="styles.css">
<!-- 1. Load into storage -->
<!-- IE need polyfill -->
<script src="node_modules/core-js/client/shim.min.js"></script>
<script src="node_modules/zone.js/dist/zone.js"></script>
<script src="node_modules/reflect-metadata/Reflect.js"></script>
<script src="node_modules/rxjs/bundles/Rx.js"></script>
<script src="node_modules/@angular/core/bundles/core.umd.js"></script>
<script src="node_modules/@angular/common/bundles/common.umd.js"></script>
<script src="node_modules/@angular/compiler/bundles/compiler.umd.js"></script>
<script src="node_modules/@angular/platform-browser/bundles/platform-browser.umd.js"></script>
<script src="node_modules/@angular/platform-browser-dynamic/bundles/platform-browser-dynamic.umd.js"></script>
<!-- 2. Load into 'modules' -->
<script src='app/app.component.js'></script>
<script src='app/app.module.js'></script>
<script src='app/main.js'></script>
</head>
<!-- 3. display application -->
<body>
<my-app>Loading...</my-app>
</body>
</html>
index.html
analysis.
<body>
add to label
<my-app>
label.
main.js
call in
bootstrapModule
function, it reads the
AppModule
metadata, found in the startup component
AppComponent
and find
my-app
selector, navigate to a name named
my-app
and then load the content between the tags 1.2.10. Add some styles 
styles.css
file code is:
styles.css
file:h1 {
color: #369;
font-family: Arial, Helvetica, sans-serif;
font-size: 250%;
}
body {
margin: 2em;
}
$ npm start
node_modules
.