3.4.1. MongoDB download 
MongoDB provides precompiled binaries for 32-bit and 64-bit systems. You can download and install them from MongoDB’s official website. MongoDB precompiled binaries can be downloaded from https://www.mongodb.com/download-center/community .
Note: Windows XP systems are no longer supported after MongoDB version 2.2. The latest version also has no installation files for 32-bit systems.
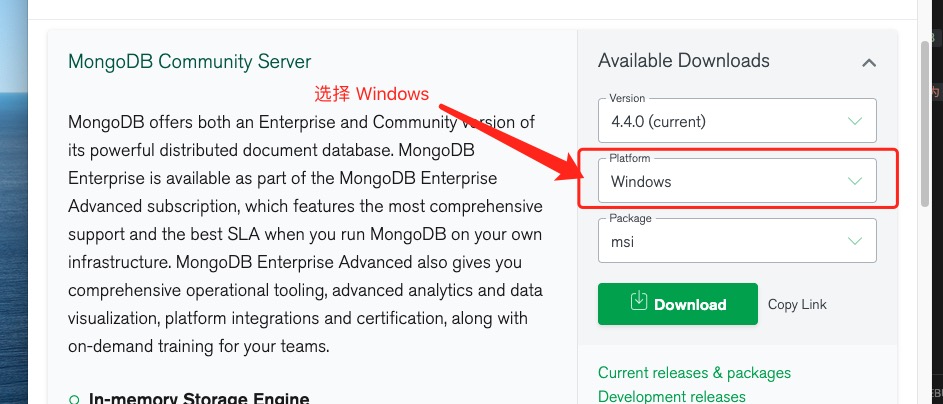
MongoDB for Windows 64-bit Suitable for 64-bit Windows Server 2008 R2, Windows 7, and the latest version of Window system.
MongoDB for Windows 32-bit Suitable for 32-bit Window system and the latest Windows Vista. The database of MongoDB on a 32-bit system is the largest 2GB.
MongoDB for Windows 64-bit Legacy Suitable for 64-bit Windows Vista, Windows Server 2003, and Windows Server 2008.
Download the .msi file, double-click the file after download, and follow the instructions to install it.
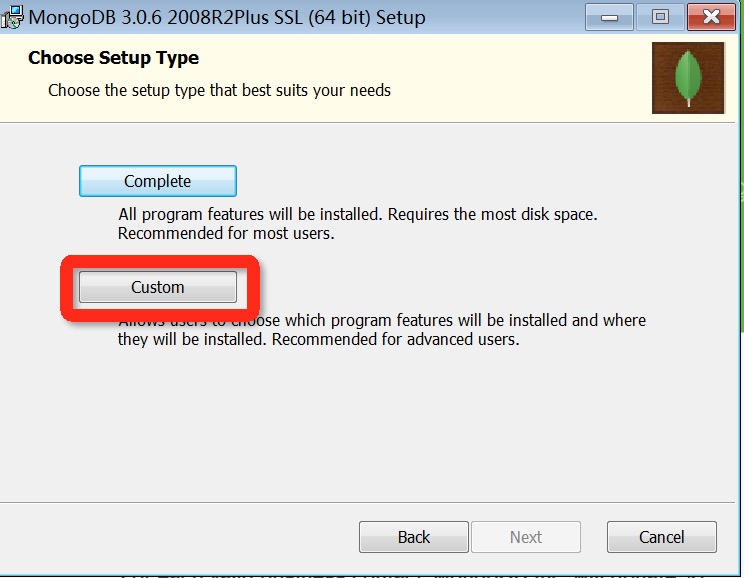
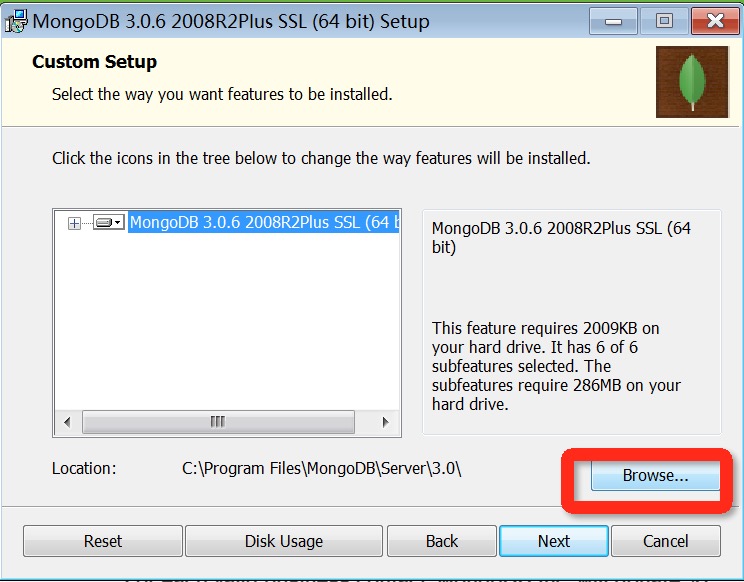
During installation, you can set up your installation directory by clicking the “Custom” button.
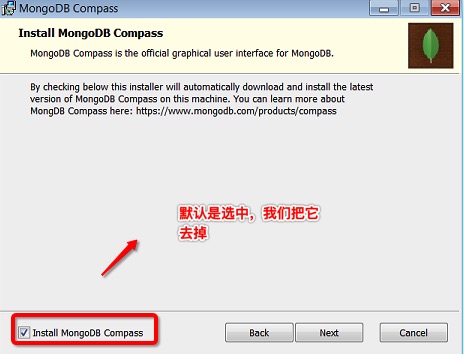
Next step to install “install mongoDB compass” Uncheck (of course, you can choose to install it, which may take longer to install), MongoDB Compass is a graphical interface management tool, we can download and install it from the official website at https://www.mongodb.com/download-center/compass .
创建数据目录
MongoDB stores the data directory under the db directory. However, this data directory will not be created actively, we need to create it after the installation is complete. Note that the data directory should be placed under the root directory (for example, C:or D:, etc.).
In this tutorial, we have installed mongodb on disk C, so now let’s create a data directory and then create a db directory in the data directory.
cd C:\
md "\data\db"
You can also create these directories in window Explorer, not necessarily from the command line.
3.4.2. Run the MongoDB server under the command line 
To run the MongoDB server from a command prompt, you must execute the mongod.exe file from the bin directory of the MongoDB directory.
C:\mongodb\bin\mongod --dbpath c:\data\db
If the execution is successful, the following information is output:
2015-09-25T15:54:09.212+0800 I CONTROL  Hotfix KB2731284 or later update is not
installed, will zero-out data files
2015-09-25T15:54:09.229+0800 I JOURNAL  [initandlisten] journal dir=c:\data\db\j
ournal
2015-09-25T15:54:09.237+0800 I JOURNAL  [initandlisten] recover : no journal fil
es present, no recovery needed
2015-09-25T15:54:09.290+0800 I JOURNAL  [durability] Durability thread started
2015-09-25T15:54:09.294+0800 I CONTROL  [initandlisten] MongoDB starting : pid=2
488 port=27017 dbpath=c:\data\db 64-bit host=WIN-1VONBJOCE88
2015-09-25T15:54:09.296+0800 I CONTROL  [initandlisten] targetMinOS: Windows 7/W
indows Server 2008 R2
2015-09-25T15:54:09.298+0800 I CONTROL  [initandlisten] db version v3.0.6
……
3.4.3. Connect MongoDB 
We can run the mongo.exe command in the command window to connect to the MongoDB and execute the following command:
C:\mongodb\bin\mongo.exe
3.4.4. Configure the MongoDB service 
注意: Some new versions of MongoDB have already done most of the configuration on their own, and if the following directory already exists, you can skip this section directly.
管理员模式打开命令行窗口
Create a directory and execute the following statement to create a directory for database and log files
mkdir c:\data\db
mkdir c:\data\log
创建配置文件
Create a configuration file. The file must set the systemLog.path parameter, including some additional configuration options.
For example, create a configuration file located in C:mongodbmongod.cfg, where you specify systemLog.path and storage.dbPath. The specific configuration is as follows:
systemLog:
    destination: file
    path: c:\data\log\mongod.log
storage:
    dbPath: c:\data\db
Install the MongoDB service 
Install the service by executing mongod.exe, using the– install option, and using the– config option to specify the previously created configuration file.
C:\mongodb\bin\mongod.exe --config "C:\mongodb\mongod.cfg" --install
To use an alternate dbpath, you can specify it in the configuration file (for example: C:mongodbmongod.cfg) or on the command line with the– dbpath option.
If desired, you can install services for multiple instances of mongod.exe or mongos.exe. Just specify a different instance name by using– serviceName and– serviceDisplayName. Only when there are sufficient system resources and the design of the system needs to be done.
Start the MongoDB service
net start MongoDB
Turn off the MongoDB service
net stop MongoDB
Remove MongoDB service
C:\mongodb\bin\mongod.exe --remove
命令行下运行 MongoDB 服务器 And 配置 MongoDB 服务 You can start it any way you want.
Just choose an operation.
3.4.5. MongoDB backend manages Shell 
If you need to enter the MongoDB background management, you need to first open the bin directory under the mongodb installation directory, and then execute the mongo.exe file. MongoDB Shell is the interactive Javascript shell that comes with MongoDB, which is used to operate and manage MongoDB.
When you enter the mongoDB background, it will link to the test document (database) by default:
> mongo
MongoDB shell version: 3.0.6
connecting to: test
……
Because it is a JavaScript shell, you can run some simple arithmetic operations:
> 2 + 2
4
>
db Command is used to view the document (database) of the current operation:
> db
test
>
Insert some simple records and find it:
> db.runoob.insert({x:10})
WriteResult({ "nInserted" : 1 })
> db.runoob.find()
{ "_id" : ObjectId("5604ff74a274a611b0c990aa"), "x" : 10 }
>
The first command inserts the number 10 into the x field of the runoob collection.