This section demonstrates how to create an application for < AppML > through the following four simple steps.
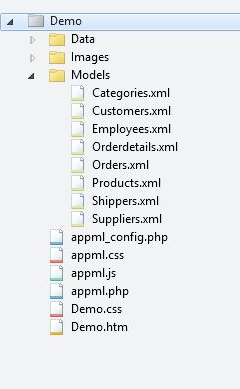
The next chapter will show you how to download < AppML > and start developing Web applications on your own computer. Create a file using the following Models (we recommend) save the file as Customers.xml in the subdirectory. The < appml > tag defines the model. The < datasource > tag defines the data source for the model. The < database > tag defines the database. The < connection > tag defines the link to the database. < sql > tag definition data query The < orderby > tag defines the default sort. The < query > tag defines a legal query filter. In the first < AppML > app, create a HTML page: Add cascading styles to your web page when executing e < AppML > app: Add a script to your web page to run < AppML > app: Example The < AppML > library contains a large number of functions. These functions can be called from your web page. <script src=”appml.js”> The < AppML > library is loaded. JavaScript statement: app=new AppML(“appml.htmlx”,”Models/Customers.xml”); Create the AppML application object, and then execute the web server script “appml.htmlx” to load the data from the “Customers.xml” file. JavaScript statement app.run(“Place01”,”Template01”); Insert the data into the HTML element of the id= “Place01”, using the id= “Template01” attribute element as the template. Attribute id=”appml_row” Each piece of data is defined to be inserted into the HTML element. The data in the # tag is replaced with the data of the model. All of the above, can you imagine a faster prototype? When the web page loads, you can load the < AppML > controller in the page. Using the < AppML > controller, you can create < AppML > objects on the page. When you run the < AppML > object on the page, it requests the server data controller. The < AppML > object receives data from the server (using the data model). The < AppML > object (or your code) displays the data on the page. (optional) web users can change the data. (optional) < AppML > can send data in the background of the server. (optional) the server controller can store data on the server side. Web folder: Demo Data folder: Data Picture folder: Images Model folder: Models Application: Demo.htm Style: Demo.css < AppML > configuration file: appml_config.php (or .htmlx) < AppML > style file: appml.css < AppML > browser Controller: appml.js < AppML > Server Controller: appml.php (or.htmlx) You can put the < AppML > object on the HTML page. < AppML > does not affect the rest of the page. < AppML > the default is the standard display page when the solution page does not exist. This is the perfect rapid prototyping. But the main function of < AppML > is not for the display of the page. < AppML > is mainly about reading application data. The data it brings can be designed to display by freely using HTML, CSS, and JavaScript. You can: Write your own HTML and let AppML process the data. Invokes the model and handles all displays. Use the properties and methods of AppML to create other combinations. You will soon find that < AppML > has powerful capabilities to provide data and data models for your web applications. You can: Define data security for users or user groups Connect to all types of databases, such as Access, MySQL, SQL, and Oracle Connect XML file and Text file Define data types, data formats, and data restrictions. Add any new elements to the model. 4.2.1. 1.创建模型(Model) 
<appml>

<datasource>
<database>
  <connection>Demo</connection>
  <sql>SELECT CustomerName,ContactName,City,Country FROM Customers</sql>
  <orderby>CustomerName</orderby>
</database>
</datasource>

<filters>
  <query>
  <field>CustomerName</field>
  </query>
</filters>

</appml>
Model analysis 
4.2.2. two。 Create a WEB page 
Example 
<!DOCTYPE html>
<html>
<body>

<h1>My First Web Application</h1>

<table>
<tr>
  <th>Customer</th>
  <th>City</th>
  <th>Country</th>
</tr>
<tr>
  <td>Alfreds Futterkiste</td>
  <td>Berlin</td>
  <td>Germany</td>
</tr>
</table>

</body>
</html>
4.2.3. 3. Add Styl 
Example 
<!DOCTYPE html>
<html>

<head>
<link rel="stylesheet" href="appml.css">
</head>

<body>
<h1>My First Web Application</h1>

<table class="appmltable">
<tr>
  <th>Customer</th>
  <th>City</th>
  <th>Country</th>
</tr>
<tr>
  <td>Alfreds Futterkiste</td>
  <td>Berlin</td>
  <td>Germany</td>
</tr>
</table>

</body>
</html>
4.2.4. 4. Add a script and then execute the application 
<!DOCTYPE html>
<html>

<head>
<link rel="stylesheet" href="appml.css">
</head>

<body>
<h1>My First Web Application</h1>

<div id="Place01">

<table id="Template01" class="appmltable">
<tr>
  <th>Customer</th>
  <th>City</th>
  <th>Country</th>
</tr>
<tr id="appml_row">
  <td>#CustomerName#</td>
  <td>#City#</td>
  <td>#Country#</td>
</tr>
</table>
</div>

<script src="appml.js"></script>
<script>
app=new AppML("appml.htmlx","Models/Customers.xml");
app.run("Place01","Template01");
</script>

</body>
</html>
4.2.5. Case analysis 
4.2.6. How does it work? 
4.2.7. Typical Web files and folders: 
4.2.8. There is no limit 