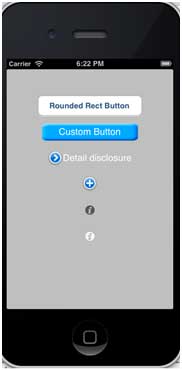
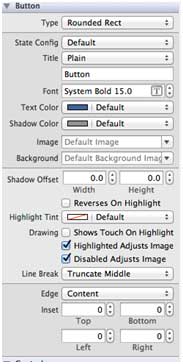
Buttons are used to handle user actions. It intercepts the touch event and sends the message to the target object. You can change the xib button properties in the property inspector of the Utility area (utility area, right side of the window). Button Typ UIButtonTypeCustom UIButtonTypeRoundedRect UIButtonTypeDetailDisclosure UIButtonTypeInfoLight UIButtonTypeInfoDark UIButtonTypeContactAdd Important attribute ImageView TitleLabel An important method Add a custom method addDifferentTypesOfButton 我们将命名为”Button_Default.png”和”Button_Highlighted.png”的个图像添加到我们的项目,可以通过将图像拖到列出了我们的项目文件的导航区域来完成。 Update viewDidLoad in ViewController.m, as shown below Now when we run the application, we get the following output: 9.11.1. Rounded rectangle button 

9.11.2. Button properties in xib 
+ (id)buttonWithType:(UIButtonType)buttonType
- (UIImage *)backgroundImageForState:(UIControlState)state
- (UIImage *)imageForState:(UIControlState)state
- (void)setTitle:(NSString *)title forState:(UIControlState)state
- (void)addTarget:(id)target action:(SEL)action forControlEvents: (UIControlEvents) controlEvents
-(void)addDifferentTypesOfButton
{
    // A rounded Rect button created by using class method
    UIButton *roundRectButton = [UIButton buttonWithType:
    UIButtonTypeRoundedRect];
    [roundRectButton setFrame:CGRectMake(60, 50, 200, 40)];
    // sets title for the button
    [roundRectButton setTitle:@"Rounded Rect Button" forState:
    UIControlStateNormal];
    [self.view addSubview:roundRectButton];

    UIButton *customButton = [UIButton buttonWithType: UIButtonTypeCustom];
    [customButton setBackgroundColor: [UIColor lightGrayColor]];
    [customButton setTitleColor:[UIColor blackColor] forState:
    UIControlStateHighlighted];
    //sets background image for normal state
    [customButton setBackgroundImage:[UIImage imageNamed:
    @"Button_Default.png"]
    forState:UIControlStateNormal];
    //sets background image for highlighted state
    [customButton setBackgroundImage:[UIImage imageNamed:
    @"Button_Highlighted.png"]
    forState:UIControlStateHighlighted];
    [customButton setFrame:CGRectMake(60, 100, 200, 40)];
    [customButton setTitle:@"Custom Button" forState:UIControlStateNormal];
    [self.view addSubview:customButton];

    UIButton *detailDisclosureButton = [UIButton buttonWithType:
    UIButtonTypeDetailDisclosure];
    [detailDisclosureButton setFrame:CGRectMake(60, 150, 200, 40)];
    [detailDisclosureButton setTitle:@"Detail disclosure" forState:
    UIControlStateNormal];
    [self.view addSubview:detailDisclosureButton];

    UIButton *contactButton = [UIButton buttonWithType:
    UIButtonTypeContactAdd];
    [contactButton setFrame:CGRectMake(60, 200, 200, 40)];
    [self.view addSubview:contactButton];

    UIButton *infoDarkButton = [UIButton buttonWithType:
    UIButtonTypeInfoDark];
    [infoDarkButton setFrame:CGRectMake(60, 250, 200, 40)];
    [self.view addSubview:infoDarkButton];

    UIButton *infoLightButton = [UIButton buttonWithType:
    UIButtonTypeInfoLight];
    [infoLightButton setFrame:CGRectMake(60, 300, 200, 40)];
    [self.view addSubview:infoLightButton];
}
9.11.3. Note: 
(void)viewDidLoad
{
    [super viewDidLoad];
    //The custom method to create our different types of button is called
    [self addDifferentTypesOfButton];
    //Do any additional setup after loading the view, typically from a nib
}
9.11.4. Output 